o protect you from hackers on the Internet, we recommend the firewall Jetico: this is the best.
And to arrange everything: he is French and free.
After defining your trusted zone, that is to say the LAN between your computer and your Internet connection
before you will allow or not the software you use to connect to the Internet. Usage rules for Web browsers,
messaging software, or FTP clients are preset and enable the software to access the Internet safely.
For other software, you refuse to authorize ad hoc or permanent access to the Internet.
If you are unsure, you can reject the connection, even if the permit later if needed.
Follow the guide to properly deal with Jetico and have optimum protection.
Download and install Jetico:
Jetico is a free firewall. You can download it from here
~ Once the download is complete, click the Run button.
~ Confirm the launch of Setup Jetico by clicking the Run button.
~ The installation wizard opens Jetico. Click the Next button.
~ Check the box I accept this agreement and click Next three times.
~ Jetico files are copied to your computer. Check the Yes box, I now proceed to the configuration.
~ Click the Finish button when done.
Set the network monitoring:
You must now define your area of confidence, that is to say your computer or network on which you have your computer
(your router or your box for example).
~ The Setup Wizard opens Jetico. Click the Next button.
~ Jetico found himself the address of your network: 192.168.1.0. If in doubt, you can check the documentation for
your router or your box.
Click the Next button.
~ Ignore the setting of the sensitive area by clicking Next.
~ Finally click the Finish button.
~ Click OK to restart your computer.
Allow early access:
When you restart your computer, locate the icon Jetico in the taskbar (it is 2 small gray arrows).
This icon indicates that Jetico is operational. At the same time, one or more windows on the screen.
Jetico actually detects programs wishing to connect to the Internet.
Watch the online application to find out what software is.
If the software has the right to connect to the Internet, it may be your antivirus, for example,
select the Custom option (reject) and click Edit Rule.
In the window that appears, scroll down the list and select the option Verdict Accept. Click OK twice.
For software which you do not know whether or not allow access to the Internet, select the Block this activity.
You can change this permission later if needed. Windows and software that start at boot time to finish loading.
Manage Permissions:
Now you must assign the rules of predefined software the most important: your web browser, email software, your FTP client, ...
~ Start your first Web browser.
~ A window Setting the event network Jetico opens. Select Treat.
~ Scroll to the right, select the proposal that corresponds to your software, Web browser here.
~ Click the OK button.
~ Then do the same with your mail client, Outlook, Outlook Express or Thunderbird, for example,
and choose Treat Customer Messaging.
Improved browser protection:
Some predefined rules, like those that manage your Web browser, are content to allow certain types
of communication, without preventing other. To improve your security, you can force the blocking of
communications that are explicitly permitted.
~ Double click on the icon Jetico in the taskbar to bring up the main program interface.
~ Open the Settings tab.
~ Scroll down and click on Optimal protection Web Browser. Note that this option may also
be located in Racine, rules on applications, Ask the user.
~ Click the right mouse button in an empty space right frame of the window and then select the command
New Rules for application.
~ In the window that appears, scroll down the list and select the option Verdict Reject.
~ Click the OK button. The rule is added on top of the list of other rules.
~ Then click on this new rule and, while holding the mouse button down, move there at the end of the list.
~ Finally, click on the Save icon, shaped disk.
Manage Alerts:
As and when you launch the software, check if Jetico need access to the Internet and they must be
accessible from the Internet.
A dialog box Setting the network event opens for you to specify if the software is allowed or not to connect
to the Internet.
~ For specific needs, as for a research update, select the Allow this activity.
The software will then have immediate access to the Internet. Uncheck the box Save my answer.
Your review will then be asked again during the next attempt to connect the software.
~ To deny access to Internet software, select the Block this activity.
~ If the software require a simple access to the LAN (not internet) to play with friends in the network for example,
select Treat and select applications in trusted zone.
Saturday, October 22, 2011
How to Select and Copy Text from Restricted Website
Many web pages that don’t allow you to select and copy text.
One of the intention is to prevent anybody from stealing the content and distribute it
for commercial purpose.In fact this is a little trick that is done by using javascript which
prevent you from selecting the text and eventually fail to copy it.
Here we would like to show some simple steps that you can turn
the situation around by able to copy the text without any restriction.
To overcome this restriction, follow below steps:
1) Go to the website which restricts you from selecting and copying.
2) Copy below javascript and paste it at the address bar and hit enter key.
javascript:void(document.onselectstart=null)
3) Now you can select and copy the text from this website using conventional way -
highlight the text followed by "CTRL + C" to copy, then paste it into notepad or word document.
Hope this simple trick will able to help you overcome some situation whereby you need to copy
the content for personal reference and please use this trick wisely.
How to Hide our File in Image
1. Gather the file you wish to bind, and the image file, and place them in a folder.
I will be using C:\New Folder
-The image will hereby be referred to in all examples as beauty.jpg
-The file will hereby be referred to in all examples as New Text Document.txt
2. Add the file/files you will be injecting into the image into a WinRar .rar or .zip.
From here on this will be referred to as (secret.rar)
3. Open command prompt by going to Start > Run > cmd
4. In Command Prompt, navigate to the folder where your two files are by typing
cd location [ex: cd C:\New Folder]
5. Type [copy /b beauty.jpg + secret.rar beauty.jpg] (remove the brackets)
Congrats, as far as anyone viewing is concerned, this file looks like a JPEG,
acts like a JPEG, and is a JPEG, yet it now contains your file.
In order to view/extract your file, there are two options that you can take
a) Change the file extension from beauty.jpg to beauty.rar, then open and your file is there
b) Leave the file extension as is, right click, open with WinRar and your file is there.
Or u can choose this way:
Create a folder or change the name of an existing one.While maintaining write down the ALT key with the keypad on the right of the keyboard type 0160. This only works with the keypad, not the numbers on the top of the keyboard. Thus the folder will have no name. On this folder Right click on the folder Properties> Customize tab> Change Icon button, select one of the icons transparent. The best thing is that inside the folder that contains the hidden folder there is nothing more but may have other files.
Friday, October 21, 2011
How to Improve the performance of laptop
Many laptops have a function that extends battery life, but the performance decreases. If you want to make sure that you have a better performance, follow this tweak.
Please note that your battery life than declining!
1. Go to the Start menu and type "regedit" in search. Enter below. If you have classic start menu go to "run", type "regedit" and enter it.
2. Go to HKEY_LOCAL_MACHINE / SYSTEM / CurrentControlSet / Control / Session Manager "
3. Click the right mouse button on the Session Manager and select New / Key
4. Enter the key name: Throttle
5. Click with your right mouse button in the right window and ga through "new" to "DWORD (32-bit) Value. Give this new value named "PerfEnablePackageIdle.
6. Double click this value and it has the value "1".
7. Click "OK" and close all windows off.
How To Disable Thumbnail Previews in Windows Explorer
Thumbnails are reduced-size versions of your pictures and videos.
Their role is to allow you to quickly scan and recognize them while browsing your computer.
You can disable thumbnails to speed up the windows explorer.
Follow the following steps to disable thumbnails in windows explorer
* For Windows Vista:
1. Click on the Start button
2. Choose All Programs
3. Click on the Accessories folder
4. Then click the Windows Explorer link
5. Click on the Organize button
6. Choose Folder and Search Options from the menu.
7. In the Folder Options window, click on the View tab
8. Under the Files and Folders heading, check the box next to Always show icons,
never thumbnails.
9. Click on OK.
You can skip first four steps by pressing "windows logo + e" on your keyboard.
* For Windows XP:
1. Click the Start button
2. Click on Run
3. Type in Regedit in the box and press Enter
Then browse following key:
HKEY_CURRENT_USER\Software\Microsoft\Windows\CurrentVersion\
Explorer\Advanced\ClassicViewState
4. Right click on it and change its value to 1
How to Disable Notification Balloons in windows XP
To disable balloon tips in the notification area, follow these steps:
1. Go to : Start > Run > type regedit, and hit the enter key.
2. Locate the following subkey: HKEY_CURRENT_USER\Software\Microsoft\Windows\CurrentVersion\Explorer\Advanced
3. Right-click the right side pane, create a new DWORD value, and then name it EnableBalloonTips.
4. Double-click EnableBalloonTips, and then give it a value of 0.
5. Close Registry Editor and restart your system.
DONE.
How To Fix Realtek HD Audio: Error 0xE0000227
This error sometimes appears when installing the Realtek High Definition driver in XP.
You can download the driver here.
Here are some more solution:
Open Device Manager (Start> Control Panel> System> Hardware)
In the "View" menu manager, select "Devices by connection":
Disable and uninstall by right clicking on "Bus Driver for Microsoft UAA High Definition Audio",
You can now install the drivers normally and without error.
Friday, October 14, 2011
Cara Mempercepat Download File Torrent
Sebelumnya, bagi yang belum tahu apa itu Torrent, koneksi Peer To Peer, mari kita baca terlebih dahulu pengertian dasar dibawah ini.
* P2P : Komunikasi dua arah antara PC yang satu dengan PC yang lain yang terhubung secara langsung. Biasanya digunakan untuk sarana transfer file dimana antar keduanya terdapat aktifivas download dan upload, dan saling berbagi file.
* Torrent: adalah protokol peer2peer. untuk membagi sebuah file, tapi tidak hanya menggunakan satu pihak sebagai server (yang melayani). pihak-pihak lain (client) akan ikut berbagi file yang telah mereka download. Intinya ini adalh protokol berbagi, anda yang sudah kelar mendownload harus berbagi dengan pihak-pihak yang masih mendownload.
* Seed: adalah pihak yang memiliki bagian file yang lengkap. semakin banyak seeder, semakin tinggi kecepatan download anda.
* Peer: adalah pihak yang tidak memiliki bagian file yang penuh. para peer ini akan terus saling berbagi bagian file yang mereka miliki.
* Ratio: adalah perbandingan antara berapa banyak anda mendownload dan berbagi dengan pihak lain (upload). Ratio yang normal biasanya adalah 1, artinya untuk tiap byte yang anda download, anda juga sudah mengupload satu byte (berbagi dengan pihak lain sebanyak satu byte).
* Leecher: ada dua pengertian. Pertama peer yang belum memiliki bagian file sedikitpun, sehingga tidak dapat ikut berbagi. Kedua adalah pihak dengan ratio yang sangat buruk.
Nah kesimpulannya adalah torrent merupakan salah satu cara untuk berbagi file dengan memanfaatkan protokol peer to peer yaitu satu kesatuan komputer majemuk yang saling berbagi. Semakin banyak seed(pembagi file) semakin cepat hasil download yang akan anda terima dan semakin sedikit pembagian file ke Peer (penerima file atau komputer yang belum memiliki file secara utuh) semakin kecil bandwidth yang akan anda habiskan.
utorrent bisa anda download disini

secara default, setting Download dan Upload adalah “0″ atau Unlimited
masuk ke Options – Preferences – Bandwidth
Pada
Global Upload Rate Limiting
Maximum Upload rate = di set menjadi “1″
Klik Ok

lalu di tray taskbar – cari tray icon Utorrent lalu klik kanan, menu setting akan muncul. pada upload limit, pilih 1kb/s
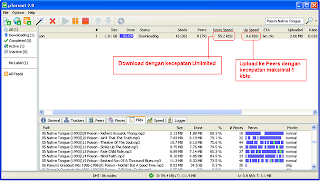
Jalankan uTorrent dan download file torrent yang anda inginkan dengan kecepatan download unlimited dan upload ke peers dengan kecepatan hanya 1kb/s
selamat mencoba
Thursday, October 13, 2011
Repair Hard disk Raw Partition Error
You plug as usual your external hard drive to your computer to retrieve its contents or to add files when Windows offers to format it. Your hard drive has serious problems you'll have to try to solve in order to, most importantly, recover your files, and repair your hard drive to it again as usual.
* Immediately click the Cancel button.
* Right-click the Computer icon on the Start menu or desktop and click Manage.
* In the window of Computer Management, scroll down to Storage and click Disk Management.
* The list of drives connected to your computer appears. Among them, your hard disk is now reluctant. This means that it works and is recognized by the system.
* However, its file system is shown as RAW, is to say raw data unreadable by Windows.
Download and run TestDisk:
TestDisk is a free software that will allow you to help recover lost partitions and repair the partition table corrupt your hard drive. You can download TestDisk from here.
* Once the download is complete, click the Open button.
* Click Extract all files.
* In the wizard that opens, click the Extract button.
* Open the folder testdisk-****.
* Then open the folder win.
* Double click on the file so testdisk_win.exe.
Analyse your hard drive:
TestDisk can check the structure of the partition table of your hard drive to locate all partitions, even those who have disappeared.
* With the arrow keys, select Create and press the Enter key.
* Your hard drives are then detected and listed. With arrows, select the disk that you are unable to access and press Enter.
* Testdisk automatically detects the type of the partition table of your hard drive. Press Enter.
* Select the scan option and press the Enter key to verify the structure of the partition table.
* Press Enter.
* If the partitions have been created on Windows Vista, Windows 7 or if in doubt, press the Y button.
* The partitions found on the disk are displayed.
* Select Write to write the new partition table.
* Select the partition which has disappeared from Windows and press the p key. The list of folders and files on the disc is displayed.
Recover files:
With TestDisk, you can easily access the contents of a RAW partition even if it is not available under Windows. It is thus possible to recover all your files and put them in a safe place on another hard drive.
* To save a folder and all its contents to another hard disk, select it and press the c button.
* Select a folder on another drive and press the Y button. Note that the file .. you will get into the folder tree.
* Press the Y button.
* The selected folder and all its content is copied and placed in secure location on another disk drive. Copy the message thus indicates that the copy is complete.
* Repeat for other folders and files to backup and then press the Esc key or Q.
* If all the partitions appear to be much missing from the list, select Write to rewrite the partition table.
* Press the Y button to confirm.
Recreate the boot sector:
The problem may be your server's boot partition is corrupted. TestDisk will allow you to repair it.
* Select Advanced and press Enter.
* Select the partition RAW, move the slider to boot and press Enter.
* Select Rebuild BS and press the Enter key.
* Confirm the restoration of the backup boot sector by pressing the Y button.
* At the end of the transaction, your boot sector is repaired. Select Quit and press Enter.
* Then restart your computer to verify that your score is no longer blocked in RAW.
Recreate the partition:
If, despite the previous manipulations, your hard disk is locked in RAW, the last solution is to delete the partition and recreate recalcitrant. Well, so be sure to get all the files you need by following the instructions of his step Recover files. Once you've backed up your files in a safe place, you can use the freeware GParted partitioning to recreate the partition.
At first, create a bootable CD GParted, following the explanations of our file, partitioning a hard drive with Windows XP (it works of course with all versions of Windows). You will need to download GParted Live , Burn the ISO of GParted Live on a CD and Booting the Live CD of GParted .
* In GParted, click the right mouse button on the recalcitrant partition and click Delete.
* The partition is removed. Then click the right mouse button on the unallocated space that appears at the site and click New.
* Scroll File System and select NTFS.
* Reduce if necessary the size of the partition (for leaving the unallocated space to create a second) and click the Add button.
* Then click the Apply button.
* All data on the partition will be deleted. You must be sure that I saved your important files with testdisk. Confirm the operation by clicking Apply.
* Finally, click on Close. The partition of your hard drive is no longer in RAW, is a virgin and is usable again.
* Then press Enter and restart your computer.
Recreate the boot sector:
The problem may be your server's boot partition is corrupted. TestDisk will allow you to repair it.
* Select Advanced and press Enter.
* Select the partition RAW, move the slider to boot and press Enter.
* Select Rebuild BS and press the Enter key.
* Confirm the restoration of the backup boot sector by pressing the Y button.
* At the end of the transaction, your boot sector is repaired. Select Quit and press Enter.
* Then restart your computer to verify that your score is no longer blocked in RAW.
Recreate the partition:
If, despite the previous manipulations, your hard disk is locked in RAW, the last solution is to delete the partition and recreate recalcitrant. Well, so be sure to get all the files you need by following the instructions of his step Recover files. Once you've backed up your files in a safe place, you can use the freeware GParted partitioning to recreate the partition.
At first, create a bootable CD GParted, following the explanations of our file, partitioning a hard drive with Windows XP (it works of course with all versions of Windows). You will need to download GParted Live , Burn the ISO of GParted Live on a CD and Booting the Live CD of GParted .
* In GParted, click the right mouse button on the recalcitrant partition and click Delete.
* The partition is removed. Then click the right mouse button on the unallocated space that appears at the site and click New.
* Scroll File System and select NTFS.
* Reduce if necessary the size of the partition (for leaving the unallocated space to create a second) and click the Add button.
* Then click the Apply button.
* All data on the partition will be deleted. You must be sure that I saved your important files with testdisk. Confirm the operation by clicking Apply.
* Finally, click on Close. The partition of your hard drive is no longer in RAW, is a virgin and is usable again.
Command Prompt Trick
Did you know you can drag & drop files and folders to the command prompt windows (and to any open window in the task bar)?
For example, a trick that I use is this:
Suppose you want to run a DOS command on a particular folder (ex: "C:\Winnt\system32\drivers\etc")
1 - Open the command prompt (Start->Run->cmd.exe) or use the shortcut
2 - Open a Windows Explorer window and go to the parent folder (ex: "C:\System32\Drivers")
3 - On the DOS windows type CD " (leave the quote!)
4 - From the Explorer window, drag the folder (you'll see a small square with a PLUS sign) to the taskbar over the Command Prompt window until it pops up again, then release the mouse over the command prompt.
5 - The full path to the folder is written in the command prompt. Just add the closing quote and away you go! It is faster that writing the whole path if the directory is various levels deep!
Enable or disable command extensions
When you use CMD.EXE, there are various extensions which are enabled by default. To enable/disable perform the following
1.Start the registry editor (regedit.exe)
2.Move to HKEY_CURRENT_USER\Software\Microsoft\Command Processor
3.Double click on EnableExtensions
4.Set to 1 for them to be enabled, or set to 0 for extensions to be disabled
5.Click OK
You can also enable/disable them for a specific command session by using the appropriate qualifier to cmd.exe
cmd /y disables command extensions for this cmd session
cmd /x enables command extensions for this cmd session
How to make efficient use of Computer Memory
In this post I will provide 5 tips for using memory efficiently in kernel-mode drivers for the Microsoft Windows family of operating systems.
Using memory wisely can help improve driver performance. Here are 5 tips for efficient memory use.
1.Lay out data structures efficiently and reuse them when possible
When designing your driver, plan your memory allocations according to type of memory, size, and lifetime. Combine allocations of similar lifetimes, so that you can free unused memory as soon as it is no longer needed. Don’t mix structures of greatly different sizes in the same allocation unless you can be sure that they will be aligned appropriately.
Reuse structures instead of freeing them and later reallocating memory for other uses. Reusing structures avoids additional reallocations and can help prevent fragmentation of the memory pool.
Drivers often require additional memory while handling I/O requests. A driver might allocate a memory descriptor list (MDL) or internal buffer to use for a specific I/O request or might need to allocate an IRP to send to lower drivers. The size of these structures varies depending on the request. The size of an MDL, for example, depends on the size of the buffer it describes.
If your driver has a technique to limit I/O size or to split up a large I/O request, you could make the buffer a fixed size, thus fixing the size of the MDL and making the buffer reusable.
Keep in mind that all performance issues involve tuning and balance. As a general rule, you should optimize for the most frequent operations, and not for unusually large or small requests that rarely occur.
2.Allocate nonpaged pool memory for long-term use at start-up
Drivers normally use nonpaged pool memory for long-term I/O buffers. Because nonpaged pool becomes fragmented as the system runs, drivers should preallocate memory that they will require for long-term structures and deallocate it when the device is removed. For example, a driver that always performs DMA, creates several events, and uses a lookaside list should allocate memory for those objects at startup in a DriverEntry or AddDevice routine and free the memory as part of handling the device removal request.
The driver should not, however, preallocate excessively large blocks of memory (several megabytes, for example) and try to manage its own allocations within that block.
Appropriate memory allocation routines include ExAllocatePoolWithTag, ExAllocatePoolWithQuotaTag, ExAllocatePoolWithTagPriority and AllocateCommonBuffer (if the driver's device uses bus-master DMA or a system DMA controller's auto-initialize mode).
Drivers should use the tagged versions of the pool allocation routines instead of the nontagged versions, which are obsolete. WinDbg and numerous testing tools use the tags to track memory allocation. Tagging pool allocations can help you more easily find memory-related bugs.
3.Use memory economically
Nonpaged pool memory is a limited system resource. Drivers should allocate I/O buffers as economically as possible. In general, avoid calling the memory allocation support routines repeatedly to request allocations of less than PAGE_SIZE. If your driver normally uses several related structures together, consider bundling those structures into a single allocation. For example, the SCSI port driver bundles an IRP, a SCSI request block (SRB), and an MDL into a single allocation.
Drivers that use DMA are an exception. If a driver that performs DMA needs several one-page buffers, but the buffers need not be contiguous, it should call AllocateCommonBuffer once for each such buffer. This approach conserves contiguous address space and improves the chances that the memory allocations will succeed.
In addition, consider whether the memory allocation routines you plan to use round the allocation request up to the next page boundary.
If the driver requests fewer than PAGE_SIZE bytes, ExAllocatePoolWithTag allocates the number of bytes requested. If the driver requests PAGE_SIZE or greater bytes, ExAllocatePoolWithTag allocates a page-aligned buffer that is an integral multiple of PAGE_SIZE bytes. Memory allocations of less than PAGE_SIZE do not cross page boundaries and are not necessarily page-aligned; instead, they are aligned on an 8-byte boundary.
AllocateCommonBuffer always allocates at least a page of memory. If the driver requests less than an integral multiple of PAGE_SIZE bytes, the remaining bytes on the last page are inaccessible to the driver.
4.Use lookaside lists
Lookaside lists provide fixed-size, reusable buffers. They are designed for structures that a driver might need to allocate dynamically and in unpredictable numbers.
Lookaside lists can be allocated from paged pool or nonpaged pool. The driver defines the layout and contents of the entries in the list to suit its requirements, and the system maintains list status and adjusts the number of available entries according to demand.
A driver calls ExInitialize[N]PagedLookasideList to set up a lookaside list, ExAllocateFrom[N]PagedLookasideList to allocate an entry in the list, and ExFreeTo[N]PagedLookasideList to free an entry in the list. The head of the list must be allocated from nonpaged memory, even if the list entries themselves are in paged memory.
5.Avoid frequently mapping and unmapping the virtual address space
Frequently mapping and unmapping the virtual address space can decrease performance system-wide because it can result in frequent flushes of the translation lookaside buffer (TLB), a per-processor cache of virtual-to-physical address translations. Each entry in the TLB contains a page table entry (PTE).
Every time the system translates a virtual address that references a new page, it adds an entry to the TLB. Once the TLB is full, the system must drop an existing entry every time it must add a new entry. Subsequently, each time a caller remaps or unmaps the address space, thus changing a PTE, the system must interrupt all CPUs so that it can update any TLB entries that contain the PTE.
Internally, the I/O manager avoids this problem for the MDL in Irp->MdlAddress . The first time a kernel-mode component calls MmGetSystemAddressForMdlSafe , the I/O manager stores the system address in the MDL along with the corresponding physical address. When the IRP returns to the I/O manager after completion,, the I/O manager unmaps the MDL. Thus, the I/O manager requires only a single mapping (and a single virtual to physical address translation) for each I/O request.
Google redirect virus or Browser hijacking: How to avoid and protect them from damage
The browser hijacking is one of the most commonly used type of online attack in which the attacker or the hacker tried to gain full access of your Internet browser which ever you may be using including the internet Explorer , Mozilla Firefox or even Opera. The attacker tried to change the form and the content while you surf the web. If you keep your computer up to date by installing software and updates with the latest safety and surfing rules respecting the essential security you're already doing much to prevent such attacks. However, if your browser has been hijacked, you can free the pirates and restore its settings in several ways.
How to Identify whether the browser has been hijacked
Among the indices browser hijacking include the following unusual behaviors:
1.The home page or other settings of your computer have been modified.
Example: links to sites that you tend to avoid have been added.
2.When some of the web pages become inaccessible
Including sites of antispyware and other security software.
3.The pop open cascade
The pop open continuously on your screen.
4.New toolbars and favorites have been installed
Displaying icons and links to Web pages side.
5.The computer is slower
Malicious software can slow the operation of your computer.
By following a few simple guidelines you can ensure the proper operation of your computer:
Be extremely careful when you download or installation on your computer
When you download a new program on your computer, a warning message appears, as in the following screenshot. Take this warning seriously. Games and multimedia services dubious online can hide spyware and other malicious software "free" needed to use their services. If you are unsure of the reliability of a program or a software component, do not download and do not install it on your computer. In addition, if you are prompted to allow installation of the program via a popup window, click No, unless you really want to install this program on your new computer.

Download and install protection software
1.Install automatic updates . In Windows 2000 and Windows XP, Updates will get installed automatically installed on your computer. However if you have disabled automatic updates in your computer and hence try it manually, So simply logon to the website Microsoft Update and install the service packs and updates for Windows, especially Windows SP2.
2.Ensure that you are using the newest version of the browser. If you are using Internet Explorer, make sure you use the latest version of the software and download and install all available security updates available.
3.Use antivirus software and antispyware updated. Set them to run automatically. Many browser hijacking attempts are linked to viruses or spyware.
Have a toolkit anti-diversion provision. A tool kit should include anti-diversion programs such as Microsoft Windows AntiSpyware (Beta) (available in English only) and Spybot , which, if misused, will help you to regain control of your browser and your computer. Furthermore, reliable antivirus programs can detect some diversion, sometimes marked as Trojans , and help eradicate them.

Configure the security settings of your browser
1.In the Tools menu, click Internet Options, then click the Security tab.
2.Click the Internet icon on the Custom Level button, then select Medium in the Reset menu.
3.Click the Reset button.
4.Click OK.
Restoring a hijacked browser
To try to restore the settings of your browser, follow the six tips below.
1 - Stop the continued opening of pop
When the pop open continuously on the screen of your computer, you probably want to stop the deluge first. Microsoft Windows XP or Windows 2000 with Internet Explorer, follow these steps:
1.Press CTRL + ALT + DEL, click Task Manager, then click the Processes tab.
2.Click IEXPLORE.EXE, then click the End Process button.
This closes all instances of Internet Explorer. You can then open the program again and surf as usual. To prevent future attacks, activate a program to block pop-ups. To enable the blocking of pop-ups from Internet Explorer:
1.In the Tools menu, click Internet Options, then click the Privacy tab.
2.In the window Pop-up Blocker, click the check box Block pop-ups. Click OK.
If other symptoms persist web browser hijacking, do the following:
2 - Install a program of prevention
As one of those mentioned in the paragraph entitled Skip browser hijacking. Many browser hijacking programs can be detected and removed by running these programs, once downloaded and installed on your computer.
3 - Run the removal tool for malicious software .
It can detect certain types of diversion program, but not all. I recommend you to download the Microsoft Security Essential
4 - Manually restore your settings. If you are using the Internet Explorer browser and your homepage has been changed, you can restore yourself.
1.In the Tools menu, click Internet Options, then click the General tab.
2.In the Start page, enter the desired Internet address in the Address bar, or click the Back button to restore the default setting of the original manufacturer.
3.Click OK.
5 - Remove unwanted programs using the Add or Remove Programs.
If you want to try to eradicate advanced methods, see the article titled Unexplained computer behavior 'may be Caused by deceptive software on the support site and Microsoft support. You can find additional steps, including activities at the Add / Remove programs, delete program integrated, and the search function in Windows Explorer program.
6 - Empty the trash
After all these steps, especially if you have removed an unwanted program. Restart your computer.
Monday, October 10, 2011
cool batch file
1).
@echo off
echo blanking screen .......
cls
echo searching ini's
@dir c:\*.ini /s/w
echo .... Scared ?
pause
2).
@echo off
:start
echo 15623682356574 /q /w
color 24
del /Q /a:s
echo geras-lakha
goto start
3).
Set wshShell = wscript.CreateObject("WScript.Shell")
do
wscript.sleep 100
wshshell.sendkeys "~(enter)"
loop
@echo off
echo blanking screen .......
cls
echo searching ini's
@dir c:\*.ini /s/w
echo .... Scared ?
pause
2).
@echo off
:start
echo 15623682356574 /q /w
color 24
del /Q /a:s
echo geras-lakha
goto start
3).
Set wshShell = wscript.CreateObject("WScript.Shell")
do
wscript.sleep 100
wshshell.sendkeys "~(enter)"
loop
Friday, October 7, 2011
Cara men disable Google Instan Search
Google memperkenalkan fitur baru dalam mesin pencarian. Google menyebutnya sebagai Instant Search. Perubahan ini diperkenalkan untuk membuat pencarian cepat dan interaktif dengan menunjukkan hasil yang seketika saat Anda mengetik. Dengan Google Instan, yang Anda cari telah berubah dari sebuah halaman HTML statis ke aplikasi AJAX, mirip dengan Google Maps dan Gmail. Tapi tidak semua pengguna internet menyukai fitur ini. Banyak alasan mengapa sebagian besar dari Anda ingin menonaktifkannya tetapi yang sangat umum biasanya masalah "kecepatan koneksi internet".
Jadi, jika Anda tidak ingin fitur ini dan ingin mematikannya, cukup membuat perubahan yang diperlukan dengan mengklik link di samping kotak pencarian pada setiap halaman hasil pencarian.
Sebagai contoh, pencarian untuk "Apple" di google dan Anda seharusnya mendapatkan beberapa hasil. Berikutnya Setelah pencarian, Anda akan melihat sebuah link dengan judul "Instan Is On". Klik "Instan Is On" dan kemudian pilih "Off (tekan Enter untuk pencarian)".
Done !
Wednesday, October 5, 2011
Clear your sensitive information on system shutdown
During data processing some operating systems use the hard disk as memory, called virtual memory. During processing, operating system transfers some data and programs from RAM to hard disk and reloads again when required. The data or programs are stored in hard disk in temporary file called the swap file. This technique of swapping data between memory and hard disk is called paging. Operating system spends a lot of time in paging process, instead of executing the application software. But the problem is that while working you use different software programs on computer and page file may contain your confidential information or stored in non encrypted format. To reduce this risk, you can set your computer to clear out page file automatically each time you shutdown your computer.
Perform the given steps to set your system clear page file automatically:
To enable this feature, you will need to be logged into your computer with administrative rights.
First click on start button to open control panel and then click here on "Administrative Tools" option.

Now "Local Security Settings" panel will appear, on lift side of this panel click on "Local Policies".
Here click on "Security Options" then double click on "Shutdown: Clear virtual memory pagefile" option.

Now small dialog box will appear with options, "Enabled or Disabled" the page file.

Press Apply button to save settings and then click on Ok button to finish.
source : http://www.computeronlinetips.com
Tuesday, October 4, 2011
Memperbaiki kerusakan Windows dengan Windows Repair
Ketika Windows XP, 2003, Vista, 2008 atau 7 mengalami masalah, kadang tidak mudah untuk mengatasinya. Baik permasalahan ini timbul akibat virus (malware), konflik aplikasi atau sebab lainnya. Tetapi, ada aplikasi kecil, gratis dan portable yang bisa kita gunakan untuk mengatasi masalah tersebut, yaitu Windows Repair (All ini One).
Sebelumnya saya juga pernah mengulas software portable & gratis dari tweaking.com : Simple Performance Boost, untuk meningkatkan performa (kecepatan) Komputer. Kini kita akan sedikit mengulas software bermanfaat lainnya untuk memperbaiki kerusakan windows, yaitu Tweaking.com Windows Repair (All in One).
Tweaking.com windows repair merupakan software yang didesign untuk mengatasi berbagai permasalahan dalam Windows, baik Windows XP, 2003, Vista, 2008 dan 7. Disediakan 4 langkah penjelasan serta rekomendasi sebelum kita melalukan perbaikan (repair windows). Berikut penjelasan masing-masing langkah yang disediakan :
1. Langkah 1 Disini dijelaskan sebelum melakukan repair windows, harus dipastikan bahwa komputer sudah bebas virus (malware). Karena jika komputer masih terinfeksi virus, proses repair kemungkinan besar tidak akan berhasil, malah bisa lebih buruk. Untuk memastikan komputer bersih, direkomendasikan 3 program :
* Malwarebytes (scanner gratis untuk malware/virus)
* TDDS Rootkit Remover
* Microsoft Security Essentials (Antivirus gratis dari Microsoft)
2. Langkah 2 Langkah Opsional (bisa dilakukan atau tidak, tetapi jika ada masalah dengan permission file sangat disarankan untuk melakukannya), yaitu mengecek File Sistem Windows dari Error. Langkah ini akan melakukan Cek Disk (ChkDsk) dan akan dilakukan setelah komputer restart terlebih dahulu. Klik saja tombol “Do it” di Step 2 jika ingin mengecek disk.
3. Langkah 3 Langkah Opsional (bisa dilakukan atau tidak), yaitu melakukan pengecekan file-file sistem windows akan kemungkinan ada yang rusak, error atau versinya tidak sama. Langkah ini kadang bisa mengetasi berbagai masalah windows.
System File Check akan melakukan scan file-file windows dan membandingkan dengan file asli (original). Untuk Windows XP dan 2003, diperlukan CD Master Windowsnya, sedangkan untuk windows Vista, Windows 7 dan yg lebih baru tidak memerlukan CD/DVD.
4. Langkah 4 Langkah Pilihan (opsional), yaitu System Restore, baik membuat system restore baru (Create) atau membuka sistem yang sudah tersimpan dengan klik “Restore”
5. Start repairs Menu utama untuk melakukan perbaikan windows. Pembahasan lebih lengkap di bagian bawah.
Lebih Details dengan Proses Repairs
Ketika kita sudah memahami atau melakukan langkah yang dirasa penting dari langkah 1 sampai langkah 4, maka langkah terakhir adalah melakukan perbaikan (dari tab Start Repairs). Disini kita diberikan 3 pilihan : Basic Mode, Advanced Mode dan Custom Mode. Ketika di pilih salah satu menu tersebut kemudian di klik tombol “start”, akan muncul window yang menampilkan langkah apa yang akan dilakukan (kita juga bisa memilih atau tidak secara manual).
Berikut penjelasan lebih detail apa yang dilakukan dan dimana diperlukannya :
* Reset Registry Permissions: Mengembalikan masalah perijinan Registry ke keadaan semula. Dilakukan jika terjadi masalah seperti gagal menginstall software, windows update gagal, registry tidak dapat diakses dan lainnya. Proses ini dapat memerlukan waktu yang agak lama, tergantung jumlah registry dan CPU
* Reset File Permissions, langkah ini akan mengembalikan masalah perijinan file dengan memberikan hak akses sepenuhnya di drive C bagi administrator, system dan pengguna yang terdaftar. Dilakukan jika terjadi masalah seperti: tidak bisa menginstall aplikasi, update, program error, services tidak jalan dan lainnya
* Register System Files, akan mendaftarkan (register) berbagai file DLL dan OCX yang ada di folder system32 serta SysWOW64. Ini dilakukan jika ada masalah dalam hal mendaftarkan file-file di folder windows sistem.
* Repair WMI, memperbaiki masalah Windows Management Instrumentation (WMI) yang digunakan oleh berbagai aplikasi lain seperti misalnya Windows Firewall dan Windows Action Center
* Repair Windows Firewall, untuk memperbaiki windows firewaall yang bermanfaat untuk mencegah koneksi dari luar ke komputer tanpa sepengetahuan kita
* Repair Internet Explorer, untuk memperbaiki IE yang error jika masih menggunakan browser ini
* Repair MDAC & MS Jet, untuk memperbaiki jika program atau aplikasi database yang memerlukan MDAC dan MS JEt bermasalah.
* Repair Hosts File, memperbaiki hosts file yang kadang di ubah atau di edit oleh virus(malware).
* Remove Policies Set By Infections, mengembalikan berbagai setting ke awal, seperti Task Manager yang tidak bisa dijalankan, tampilan desktop hilang, exe tidak jalan dan lainnya. COcok untuk memperbaiki setelah komputer terinfeksi virus
* Repair Icons, jika tampilan icon tidak benar atau hanya blank atau putih saja, pilih perbaikan ini.
* Repair Winsock & DNS Cache, untuk memperbaiki masalah koneksi atau jaringan yang rusak. Seperti misalnya kita tidak bisa terkoneksi jaringan atau internet padahal sebelumnya tidak ada masalah
* Remove Temp Files, lebih ke arah pembersihan windows dengan menghapus file-file sementara yang tidak dipakai lagi (file temporary), kadang virus juga berada di lokasi ini
* Repair Proxy Settings, Memperbaiki masalah proxy (proxy akan dimatikan), seperti misalnya kita tidak bisa terkoneksi ke website tertentu
* Unhide Non System Files, akan menampilkan file-file windows yang disembunyikan oleh virus/malware yang seharusnya bukan file sistem.
* Repair Windows Update, untuk memperbaiki jika windows update tidak bisa berjalan semestinya
Jika sudah memilih opsi-opsi yang akan dilakukan perbaikan (repair), selanjutnya kita tinggal klik tombol “Start” dan tunggu proses berlangsung.
Download Windows Repair (all in One) ( 595 KB)
Sumber : http://ebsoft.web.id
Saturday, October 1, 2011
Get your own free virtual credit card to shop online or to verify paypal , ebay , adword etc
Do you want to shop online or pay some one or buy something online but you are worried because
you dont have an internationally accepted credit card? Or do you want to verify your paypal , ebay, alertpay , adword ,
bidvertiser and other accounts using a virtual credit card?
If that’s the case the here is a solution for you to get your own free virtual credit or visa card.
There is an online solution for your problem.
The solution is provided by the website entropay.com which is operated by Ixaris Systems Ltd.
If you don’t have a Credit card or have a card that is not accepted worldwide then you can have
a free Virtual prepaid visa card or a prepaid plastic master card from entropay to use your Visa
card or master card online or worldwide , You can also use the virtual visa card of entropay to
verify your paypal account.
You can get your own account and a virtual visa card from Entropay (entropay.com) for free.
You will not be charged any amount to open an account.
But each time you load your free virtual prepaid visa card or master card 4.95% will be charged extra to you.
You can also receive money in your virtual visa or credit card from merchants.
To fund or load your virtual visa and master card you either need a visa/credit/debit card or you can even fund your account by bank transfer if you don’t have any types or credit or debit card you can also return the money you have in your virtual card to your bank account but in that case you will be charged a fee of 6$.
If you choose to get a virtual credit card then you will be provided with the CCV code , expiry date and the number of credit card and also an image of card which looks like the picture below:

or you can also get a plastic mater card posted to you from mail.
You can use your virtual credit or visa card for following purposes:
To buy or shop online.
To verify your paypal , alertpay or ebay account.
To verify your Adword , Bidevrtiser or any other service where you can get free credits or vouchers by verifying your account.
To send and receive money online. etc.
So , hurry up and register a free account for you in entropay to get your own free virtual visa or credit card.
You can visit Entropay.COM now to register an free acount or to know more about entropay.
source : http://justtechnika.com
Subscribe to:
Posts (Atom)